The role of Administrator
As the administrator of the account, you set up users and decide what rules apply to them. Examples of rules include:
- Whether the user should have a reserved part of the storage area and, if so, how large it should be
- Permissions for Shared Files
- Number of versions to be saved
- If Recycle Bin is to be used on the account
- Restrict users from typing in the root of Common Files
Since the administrator is the payer for the service, only he/she can upgrade the account, both in terms of the number of users and the total storage area. All costs are included in the same invoice.
You can assign the role of sub-administrator to a user, allowing that user to create and modify users and groups. See the section Modifying a user,
Subadministrator
As an administrator, you can assign the role of sub-administrator to other users. As a sub-administrator, that user can then create new users and assign permissions. To assign the role of sub-administrator to a user:
- Log in to the website www.storegate.se with your admin account
- Click on the "Account" icon in the top right corner and select "User"
- Click on the user in the list
- Click on the "Make sub-administrator" button
Administrator settings
You can find settings for the Administrator and the account in Settings under Account, but also in Settings under Team.
Here you will find settings for e.g:
- Office Online
- Two-step verification
- Version management
- Which permissions apply on the first level of common files
- Prevent users from moving files from Shared Files to My Files
- Wastepaper basket
Wastepaper basket
Recommendation from us is to have the trash active.
Anything deleted from your account and other users' accounts will go into the trash and can be restored by going into the trash, selecting one or more items and clicking the restore icon,
Note that anything deleted from Shared Files goes into the administrator's trash and can only be restored from this account. If a user deletes files/folders from their own My Files storage area, they will be placed in the respective user's trash.
The Recycle Bin is active by default on all accounts, if you choose to disable it, folders and files from all accounts will henceforth be permanently deleted without the possibility of restoration. Deactivation also permanently deletes everything already in all users' recycle bins.
Administer users
Add users:
- Log in to your account via www.storegate.com and click on the old man at the top of the page on the right.
- Click Users.
- Click Create new user.
- In the box you fill in the user's details, name and email.
- Set reserved space if desired, if you choose "0 GB" there is no limit except the total storage space on the account.
- You can tick enter login details to set a username and password for the user, which you can then communicate to the person. If you don't tick it, an email will be sent to the user with a link where the user can set these details themselves when they click on Create.
- If you have checked the "Enter login details" box, you can also choose whether the user must change the password at the first login, and whether welcome emails should be sent automatically.
- Under Advanced, you can specify whether the user should have rights to create files or folders directly in the root under Shared files.
- Click Create
- If you tick Create more before clicking Create, the window will reload and you can continue creating more users
If you have chosen to send a welcome email to the user, it will be sent when you click on Create, if you have not ticked Enter login details, the user will receive an email with a link where they can enter their login details themselves.
You can then see the status of your users under the Users menu, if they have logged in and when, and if they are logged in. You can click on the user name to edit, and you can click on the icon that looks like three dots to get more choices,
Change a user
- Log in to your account and click on the icon at the top right of the page.
- Click Users.
- Click on the username of the user you want to change, or click on the icon that looks like three dots next to the user
- You can now make your changes.
- Select "Save" when you have finished making changes.
Manage Groups
Groups can be useful if you have certain users who should have access to a specific folder. Instead of giving each user access to a folder, you can give a group rights to a folder. You can then add and remove users from the group as the need arises. For example, a group could contain consultants, when a consultant quits or starts you can add them to the consultants folder and be sure that they get the same rights as the other users in the group.
Create group:
- Log in to your account and click on the icon at the top right of the page
- Click Account settings.
- Click on Team
- Click on Groups
- Select Create new group
- Enter the name of the group and finish by clicking on Create
Add users to group:
- Log in to your account and click on the icon at the top right of the page
- Click Account settings.
- Select User
- Click on the options icon on the right of the user list and select Add to group
- You then check the groups you want to add the user to and save with Add
You can also add users to groups by going to the Groups menu in Account settings.
- There you select the group by clicking on the group
- Select Add user
- You then check the users you want to add to the group and save with Add
Change permissions on a folder
- Select a folder under shared files by ticking the box in front of it
- Press the Permissions button (user icon with check mark)
- A box opens where you can select the permissions that a user or group should have on the folder
- You can tick Notify users if you want
- To save the changes, click Save
There are 5 levels of permissions:
- No permissions - Users who have no permissions to a folder will not see it at all, not on the web or via Storegate applications.
- Read - Users can view the folder and open and download its contents but cannot move, delete or modify the folder or its contents.
- Read/Write - Users can view, read, modify, delete, copy or move a folder and its contents.
- Read/Write/Sync - Same permissions as "Read/Write" plus the right to sync the folder to your computer via Storegate Sync. Note that sync is not available on all accounts.
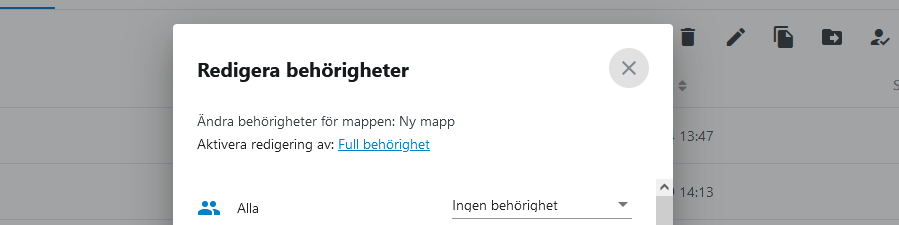
- Full Permission - The account administrator and sub-administrator (if any) have Full Permission for all folders on the common part of the account. Users have Full access to folders they create themselves. Full permissions can also be granted to a user by the account administrator or another user with Full permissions, giving the user full control over the folder and also the ability to change the permissions of others on it. Note that Full permissions cannot be granted to a group. In order to grant Full Permissions to a user, the administrator first needs to enable Full Permissions editing as shown in the picture. After that, Full Permissions will be available as an option in the list of permissions that can be assigned to users.
Permissions are only available for folders under Shared Files. When you create a new folder in Shared Files, you can set permissions on the folder at the same time. If a folder is uploaded from your computer to Storegate or if a folder is copied or moved from My Files to Shared Files, No permissions are set by default.
This is done for security reasons so that no one but you can see the folder before the permissions are changed. To make it available to others, log in to the web and assign the desired permissions.
Example
Here we show examples of how permissions can be allocated depending on the size of the company.
Smaller companies
A small company with five employees has built a simple folder structure that only regulates permissions in the root folder. Since the employees can easily communicate with each other, no major permission structure is required.
The administrator has set permissions in shared files to read/write.
All users can now create folders and documents in the root directory.
The Finance folder contains documents that should only be accessed by the Finance Manager and the CEO. Therefore, the administrator has created a group including these two and named it "Management".
When the administrator created the "Finance" folder, the permission for the predefined group "Everyone" was set to "No permission", but the group Management has been given "Read/Write". Others who now do not have permission will not be able to see this folder either. The highest authority applies.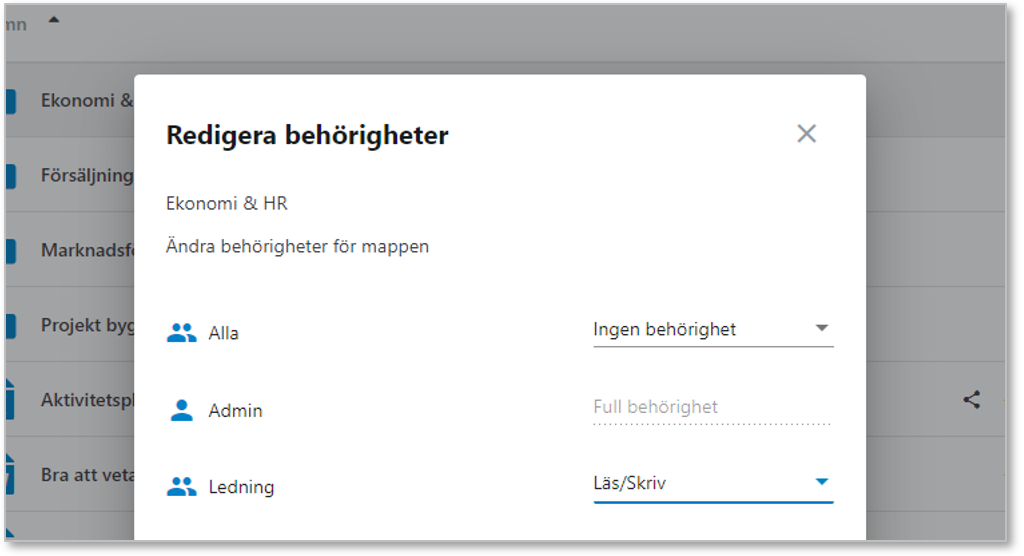
Larger companies
The larger company has 30+ employees. To keep the company's files and documents in order, the administrator needs to use Storegate's "Extended Permission Structures".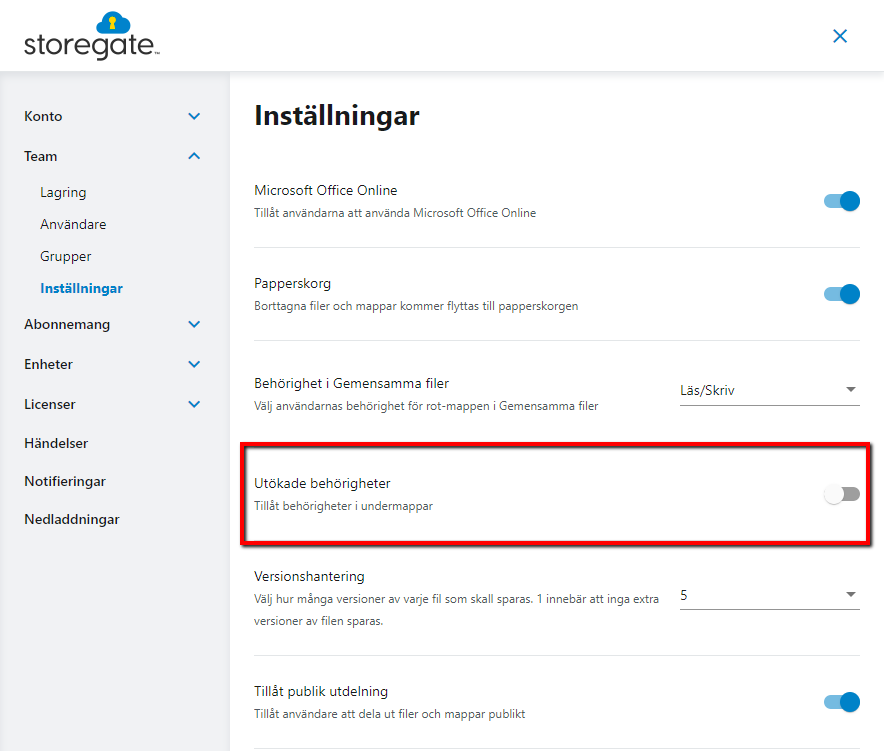
In this slightly larger organization, a subfolder permission structure is required. This is enabled by the administrator in their settings.
To prevent users from creating new folders in the root directory, the administrator has set the common setting to "Read".
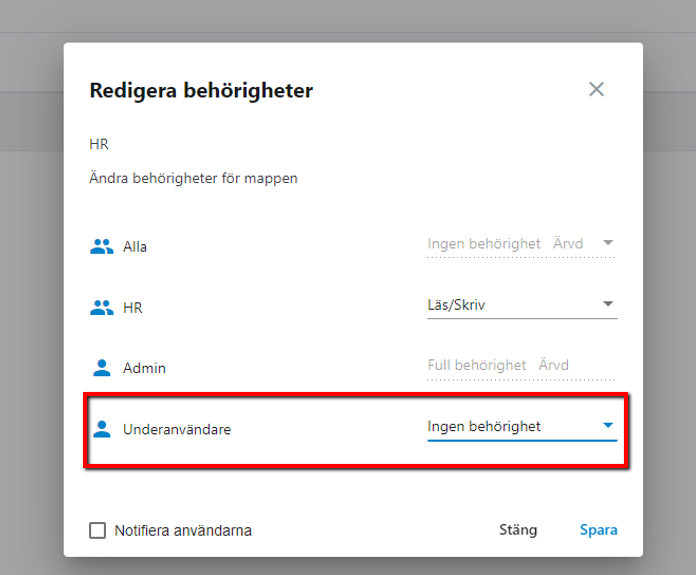
The large company has a finance department and an HR department. Their folders are in the same root folder but they should not have access to each other's folders. With extended permissions, the administrator can give the different groups access to each other's folder without letting them see each other's.
The "HR" group has access to several other folders in the common system, but the administrator does not want a single user in the group to have access to one of the folders. The administrator then selects "No access" at that user's personal level. User overrides group.